
:: Part I: Introduction :: Part II: The Config File :: Part III: The Template File ::
:: Part IV: The Base Image :: Part V: The Moment of Truth :: Part VI: Troubleshooting ::
:: Part IV: The Base Image :: Part V: The Moment of Truth :: Part VI: Troubleshooting ::
Part III: The Template File
Getting Our Bearings
The most complicated part of setting up SigMaster is configuring the template file. Once you have one template, though, you can make copies of it and change the font color (if you're using multiple different-colored base images), or otherwise adjust it to suit just about any base image.
If the file looks complex, that's because it is! It's also really easy to manipulate once you understand it, and I'm here to help you overcome that initial intimidation and master the workings of the template file.
All template files (and base images) should be located in the /modules/Roster_master/images/sigblocks directory. RM4DF includes an example template file that we're going to scrutinize and learn from; it's named "CFlogo_sigblock.txt." This is what it looks like:
// Size of the border margin around the signature block image (if any),
// in pixels. Avatars will be rescaled proportionally to fit the
// calculated height.
BORDER_MARGIN 2

// Allocate image color(s). Don't allocate more colors than you need.
// Colors are defined using a hexadecimal notation for the combination
// of Red, Green, and Blue color values (RGB). The lowest value that can
// be given to one light source is 0 (hex #00). The highest value is 255
// (hex #FF). Colors must be defined before you can use them. This is
// the same notation used in CSS and HTML color values.
COLOR    White FFFFFF
//COLOR    Black 000000
//COLOR    ForestGreen 228B22
//COLOR    LightSkyBlue 87CEFA
//COLOR    Yellow FFFF00

// Avatar type and placement. Placement is relative.
// (DEFAULT|ARCH|EQ2|RANK) (TOP|MIDDLE|BOTTOM) y, (LEFT|RIGHT) x
AVATAR  ARCH MIDDLE RIGHT

// Guild rank insignia placement. Placement is absolute.
// int x, int y
RANK  93 8

// Lines of text.
// Text area indentation, in pixels.
TEXT_LEFTINDENT   100
TEXT_RIGHTINDENT  5

// int size, int indent, int y, string color, string fontfilename, string text

// Character name and lastname.
TEXT    16 13 25 White VINERITC.TTF {$FullName}

// Adventurer class/level and artisian class/level.
TEXT    12  0 50 White VINERITC.TTF {$Adv_Class} {$Adv_Level}, {$Art_Class} {$Art_Level}

// Server name.
TEXT    12  0 70 White VINERITC.TTF {$Server} Server

// I <3 me!
TEXT    8   0 90 White FreeSansBoldOblique.ttf Roster Master for Dragonfly v6

// Guild Status Points
//TEXT    8   0 90 White FreeSansBoldOblique.ttf Status: {$guildStatus}

// Member Since
//TEXT    8   0 90 White FreeSansBoldOblique.ttf Member Since: {$JoinedDate_local}
You can edit this file using your favorite HTML editor, or failing that, Notepad. We don't have to worry about Notepad changing the file extension, since .txt is what we're working with anyway.
Breaking It Down:
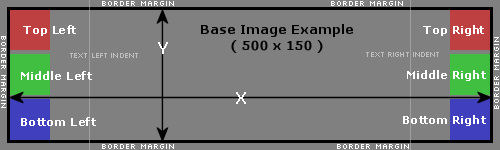
We will be dealing with a lot of "X, Y" coordinates in our foray into the workings of the template file. You should be very familiar with them if you've ever taken an algebra class in school. :)
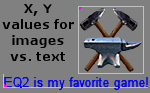
The position of "0, 0" would be the left top corner of the base image, and any increase in these values will move the given element to the right and down, respectively. For images, the values correspond to the position of the left top pixel in the image. For text, the values correspond to the leftmost end and baseline (lowest point, not including descenders) of the text string. Take a look at the following illustration to see what I mean:
- BORDER_MARGIN
- This setting defines the width of the space between the outermost edge of your graphic and the sig contents (text, rank insignia, and avatar).
- Its value should be a whole number, 0 or greater.
- See the illustration below for an example.
- COLOR
- This is where you define the text colors used in your sig.
- Each color used in a template file must be given a unique CaSe SeNsItIvE name.
- The 6 characters following the color name are a hexidecimal ("hex") code. You can find colors with their corresponding hex codes in any number of places (like this one), or you can use a color picker (I like ColorCop).
- You can specify as many colors as you want, but it's highly recommended that you don't use more than two. Fewer colors mean less system resource usage and faster rendering times.
- Any colors that you don't want to use can be safely erased, or they can be commented out by adding two forward slashes ("//") to the beginning of the line, as shown.
- AVATAR
- These settings determine what type of avatar is used in each sig and where it's placed.
- The first value is the avatar type. Learn more about using avatars here.
- The second value is where the avatar will be placed vertically.
- The third value is where the avatar will be placed horizontally.
- If you don't want to include an avatar in your sigs, this line can be safely erased, or it can be commented out by adding two forward slashes ("//") to the beginning of the line.
- See the illustration below for placement examples.
- RANK
- This setting determines where the guild rank insignia corresponding to each character's guild rank is placed.
- These values should be whole numbers, 0 or greater.
- The first value is the horizontal location, in pixels. Using "90" will indent the insignia 90 pixels to the right of BORDER_MARGIN -- NOT 90 pixels from TEXT_LEFTINDENT.
- The second value is the vertical location, in pixels. Using "10" will drop the insignia 10 pixels below the BORDER_MARGIN.
- If you don't want to include a guild rank insignia in your sigs, this line can be safely erased, or it can be commented out by adding two forward slashes ("//") to the beginning of the line.
- TEXT_LEFTINDENT
- This is the number of pixels to the right (from the left BORDER_MARGIN) that ALL sig content will be shifted.
- Its value should be a whole number, 0 or greater.
- You only really need to use a number greater than 0 if your base image has text or an image on the left side that you don't want covered by the sig content.
- See the illustration below for an example.
- TEXT_RIGHTINDENT
- This is the number of pixels to the left (from the right BORDER_MARGIN) that ALL sig content will be shifted.
- Its value should be a whole number, 0 or greater.
- You only really need to use a number greater than 0 if your base image has text or an image on the right side that you don't want covered by the sig content.
- See the illustration below for an example.
- TEXT
- This is where we define and format the text that will be appearing on our sig.
- There are several values in each line, and it's important to know what they mean and how they work:
- The first value is the font size, in pixels. The larger the number, the larger the text.
- The second value is the number of pixels to the right (from TEXT_LEFTINDENT) that this line should begin.
- The third value is the number of pixels down (from the top BORDER_MARGIN) that this line should be placed.
- The fourth value is the CaSe SeNsItIvE name of the color that the text on this line should be.
- The fifth value is the CaSe SeNsItIvE filename of the font that should be used in this line. This font file should have been uploaded to /modules/Roster_Master/fonts.
- The sixth value, and the rest of the words and variables to the end of the string, is the text that will be placed on this line.
- The variables pulled from the roster database are enclosed in {curly braces}. Their names are CaSe SeNsItIvE. The allowed variables are as follows:
- {$FullName} - The character's first and last name. If there is no last name, just the first name is displayed.
- {$Adv_Class} - The character's adventure class.
- {$Adv_Level} - The character's adventure level.
- {$Art_Class} - The character's tradeskill class.
- {$Art_Level} - The character's tradeskill level.
- {$Server} - The guild's server.
- {$guildStatus} - The character's contributed guild status.
- {$JoinedDate_local} - The date the character joined the guild, in server time.
- The displayed text string can contain any combination of words, variables, and punctuation, as long as the variables remain contained in {curly braces}.
- If you don't want to include a certain line of text in your sigs, it can be safely erased, or it can be commented out by adding two forward slashes ("//") to the beginning of the line.
Once you think you've got a good template file configured, save it and upload it to your /modules/Roster_Master/images/sigblocks directory. Before we can test it, though, we need to get creative.
It's time to play with sig base images!