
This tutorial will walk you through the basic steps needed to even out the skin tone in your character screenshots. It assumes you have a working knowledge of your graphics program of choice.
I wrote this tutorial using Paint Shop Pro 9, but it can be easily adapted to other programs; the tools I used are very basic.
1. Select your image
Crop out the excess background areas in your chosen image.
This is the shot I'll be using:

2. Get everything else out of the way!
I've cleaned up my character image, retouched the eyes, added highlights to the hair, and used the Smudge tool to soften the most noticeable skin imperfections. As you can see, even now, the skin tone is far from perfect!

3. Create a new layer
I created one new layer on top of my image and named it "Skin." I set the blend mode on this layer to "Color," but once you've finished your brushing, you may find that "Hue" works better; it depends on your image!
4. Pick your skin color
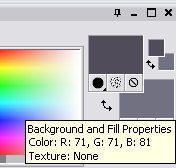
I selected one of the lightest skin tones in my screenshot...
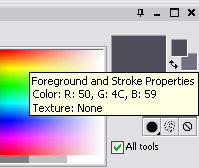
...Then lightened it a bit more to get the color I need (increasing the saturation is sometimes also a good idea):
5. Set up your Airbrush
Select your Airbrush tool from your Tools palette (in the Paint Brush menu, "B"). These are the settings I'll be using:

6. Paint away!
With the "Skin" layer active and using the airbrush settings above, brush over all of your character's exposed skin.
It doesn't have to be precise (the blend mode helps hide most overbrushing) or uniform; as an example, here is what my layer looked like when I finished with it:

7. Finishing up
As I mentioned before, you can adjust the blend mode and/or transparency of the "Skin" layer to suit your image. If necessary, use your Eraser ("X") or Magic Wand to get rid of any overbrushing that you notice.

8. All done!
Before and after:
